
Mixing Henry Park's "Rest - Covid-19 Version"
Because of all the stay-at-home orders and social distancing (which should be taken very seriously) we all don’t have tracking sessions on the calendar which is really tough. That being said I want to write a little bit about my mix sessions, which I’m super grateful to have in times like these!
The first mix I want to write about is a song I mixed for my friend Henry Park. Henry and I have known each other for four or five years now, so I was super excited when he gave me the call to mix his alt version of Rest! You can listen to the song here! He knocked the production out of the park on this track so it made my job easy when I sat down to mix.
PRE MIX
Before I got the files from Henry I asked him to include two things with the stems. First was a rough mix and second was a pdf of what I like to call pre-mix notes. Both of these things really help me out as I sit down to mix. The pre-mix notes help me know the vibe an artist is going for. For instance, Henry mentioned that he wanted the second verse vocals to be dry and that he wanted the Casio drum sounds to be made bigger and more impactful BUT not lose their Casio-ness. With any artist, these type of pre-mix notes and communicated feelings help me hit the target that the artist is envisioning for their song. The other thing that is helpful is the rough mix. I don’t listen to it a ton but I keep it in my session to occasionally reference to get a picture of the files that the artist thought were important. For instance one of the things that was helpful to listen to in Henry’s rough mix was the level that he had his vocals.
So before I jump into a mix, I try to spend an hour or two one evening organizing the files. I really like taking this time separate from my dedicated mix time to prep all the files. For me, this helps isolate the systematic and organizational side of my brain from the creative and go-with-the-flow side used for mixing. I can do things that set me up for success when I sit down to mix it. The most important thing that I do is arrange and color coating files so I know my way around the session quickly. Second is that as I’m organizing the files I’m also learning what all the different sounds are that I’m going to be working with. This helps me start to formulate a vision for my mix. You gotta know what you’re working with so that you can effectively and efficiently navigate your session!
I’m not going to talk about every source but I’ll hit a few key components and favorite parts of the mix! So lets get to it! First up vocals!
Vocals
For this song, Henry double-tracked the vocals so I had each take panned left and right. I started off putting the Avalon 737 on the vocal. I’ve been loving that plugin on a lot lately. It’s really clean and smooth sounding plus the eqs sound great too! After listening to it a little bit I wanted to give the vocal a little more weight, so I added a 1073 before the 737 with just a high pass set to 80hz. The 737 compressor and the Fairchild 660 were each doing a small amount of compression (2-3db at most) that felt just right for the track.

Bass
For most of the song there is only a bass guitar providing the low end, but at a few points in the song there is a synth bass, labeled Citrus Fuzz. I kept the bass guitar mono and used the UAD Studio D Chorus on the synth bass to add extra width. It’s such a simple plugin but really effective. The D Chorus really helped provide some separation between the low end sources.

Favorite Moment
This whole song has tons of great moments BUT the bridge of the song has two moments that I particularly love. Both are in the last measure of the bridge. First is when I automate the MXR Flanger/Doubler on and boost it 5.5 db to add intensity to a synth track. This was something I heard and felt like it was something I had heard in a Tears for Fears song so I decided to give it a shot and it fit! It was subtle but it really helped that moment get bigger and add tension right before the down chorus.

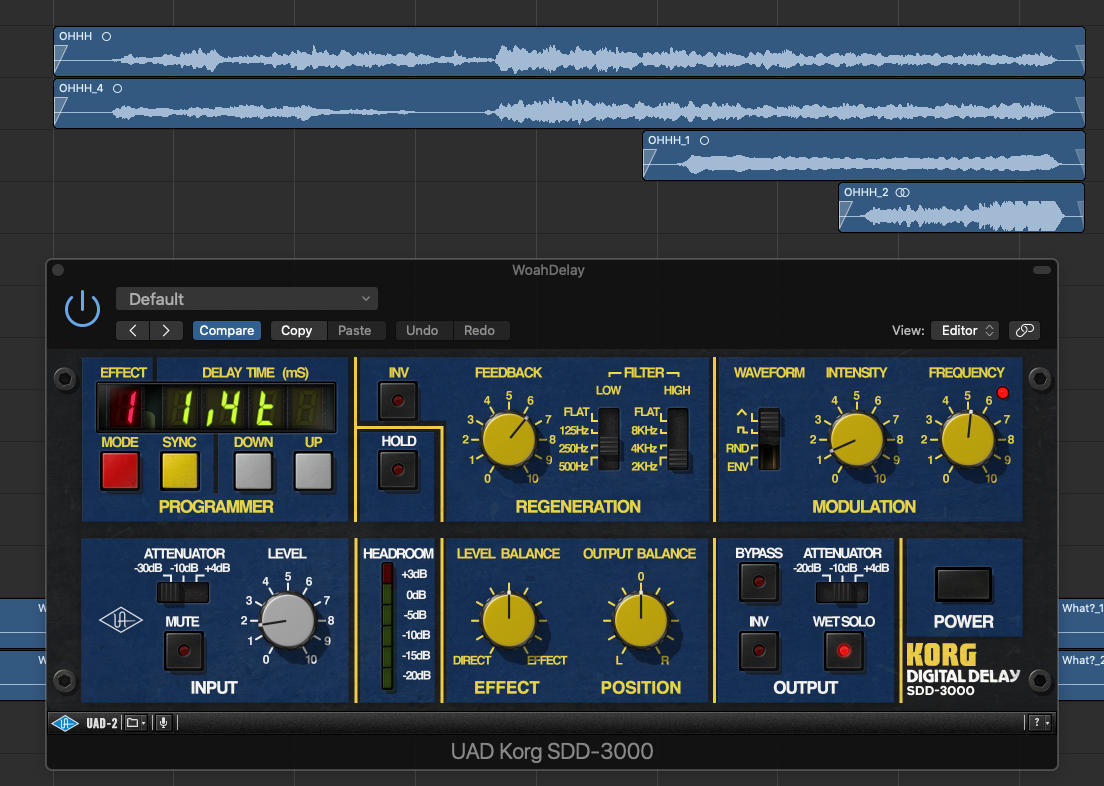
Second, is the delay throw that I did with the Korg SD 3000 on the background “woahs.” I wanted these trails to be super dark because I had the feedback set pretty high and they were going to be hanging over when the down chorus vocals came in. The SD 3000 is perfect for those kinda throws with the filter switches and the modulation section. Having a long trail like this on the last few phrases and then letting it suspend out over a down chorus really helps there be even more tension and then release. Which in this song is exactly what the bridge provides for the song, musical variation and tension, so the effects thatI apply needed to enhance that!
Honestly it’s my favorite delay that UAD makes. I’ll even give it the MVP (Most Valuable Plugin) Award for this mix. I used 5 or 6 different instances of this plugin to create depth and space! I feel like it can be clean or dark or dirty. I’m always looking for flexible tools that fit the sound I’m hearing in my head. I’m sure there are 50 different delay plugin out there that can do all the things that this one can do but to my ears, this one is my favorite!
Mix Bus
For most mixes this year I’ve had two plugins live on the mix bus. First is the Maag EQ4. Honestly, I love what this box does to my mixes. I feel like it focuses the sound and just makes things sound more like a finished mix. Most of the time I actually don’t do any EQ. If I do reach for an EQ band its typically to boost a little bit of 40 and or boost a little bit on the AIR Band. I know everyone and their dog loves boosting some 40K to open it up on top but most of the time I end up reaching for 10, 15 or 20K (for the record I have used 40K and liked it :) ). For this mix I ended up boosting a .5 db of 40Hz and 1 db of 10kHz on the Maag. Next up after the Maag is the ATR-102. Most of the time I’m leaving it on the default settings (15IPS, 1/2” tape, 456 formula, with the noise off (I do audition different formulas/tape speeds if needed)) and then tweak the input and output to get the right amount of saturation for the song. And then once I’m maybe halfway through a mix I typically check if I want to have the transformer in the signal path (this impacts your dynamics and low end so definitely audition it to see if it’s right for your track) and if I want to change any wow and flutter settings or have them in at all. For this mix I kept the transformer out to keep the dynamics a little more impactful and kept the wow and flutter in but at a minimum.
So those two are staples on the mix bus but typically a compressor and a more surgical eq live on the chain as well. For this mix, my compressor of choice was the Shadow Hills Mastering Compressor (SHMC). This thing sounds really big and open which is why I felt like it was a great fit for this track. I love being able to have optical and discrete compressors in this unit PLUS the ability to switch between the different transformers for different tones! This mix landed on the IRON transformer and doing about 1db of optical reduction and 2db of reduction with the discrete. Following the SHMC was the Manley Massive Passive. I don’t use this EQ a ton BUT for this mix it worked out great. I chose this one because it is subtly warm and can get pretty detailed if needed but also does very gentle eq moves quite well. Most of my moves were pretty small, boosting a little 150hz, notching some 680hz, gently carving away a little 3.9kHz and boosting a small amount of 16kHz just for a touch of air and sparkle up top. At the end of it all I placed the SPL Vitalizer MKii to add a little bit of width, bass enhancement and upper mid range control.

At the end of the day here was my final mix bus chain in order. SHMC > Massive Passive > Maag EQ > ATR 102 > SPL Vitalizer Mkii
Final Thoughts
There’s one last thing that I haven’t talked about that made this mix session go as well as it did. Audiomovers Listento. So while most of my mix sessions are typically unattended, this social distancing had me thinking about ways to make this mix process more personal for the mix tweak stage. The tweak stage is typically a few emails back and forth with comments like, ‘yeah turn the shaker up just a little more.’ Next email. ‘Yeah, the drummer agrees, we both want to turn the shaker up even more.’ Not to poke fun at the shaker player in your band, I’m just illustrating the point that often times the email-mix-tweak route can be a little tedious and slow.
When we used Audiomovers and Facetime to chat about the shaker volume it was just like Henry was in the room with me. I could make a tweak, hit play and he could hear the change and give me instant feedback on if the tweak was right. Anything I did, Henry was hearing come out of his speakers, automation moves, soloing tracks, plugin tweaks changes etc. It was a really awesome system that was super easy to install and set up with the other listener(s). I was doing a free fully-functioning demo that they have on their website, but their prices were really great if you need it longer than a week! Check out their website here for all the info! I would definitely recommend to anyone mixing in this social distancing age.

That about wraps it up! I hope it was a fun read, and informative and inspiring for you! Share it with someone you know who might enjoy reading it! I’d love to know what you thought of it! If you have any further questions about my process with this song or would like to book a mix session for your song, feel free to fill out my contact form or shoot me DM on Instagram and we’ll make it happen!
Happy Mixing!